Technical Config
Camera Settings
Please match the following settings in your camera when filming:
| Colour Processing | S-Log (should look washed-out before grading) |
| Frame Rate | 25fps |
| Resolution | 1920x1080 |
- We are shooting in a log colour profile which means we'll need to colour grade at the end. S-LOG makes it easier to edit the colours but it looks terrible straight off the camera. Worst case this can be done quickly using a LUT
- We are going to recording at 1080p, not 4K, primarily to reduce strain on both the NAS's and our editing computers. The larger resolutions do look better, but are pretty unwieldy for a 48h timeline.
Collaborative NAS
To make working together in such a large team possible, we use a NAS to share files and resources. To connect to this NAS you need to use SMB to mount the drive on your computer.
Windows SMB Connection
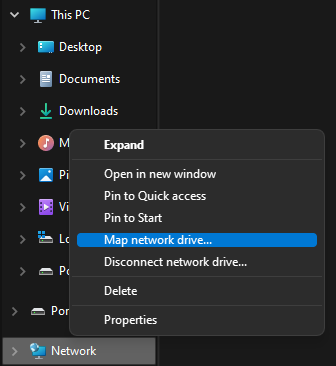
In file explorer, right click "Network" in the sidebar, then click "Map network drive".
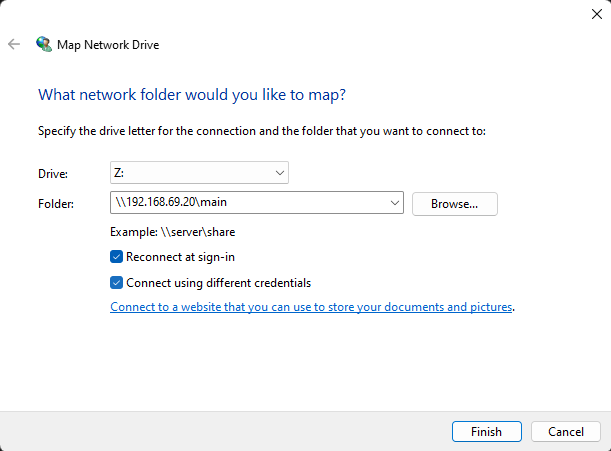
Now enter in the server SMB uri "\\192.168.69.20\main", the drive letter doesn't matter, select "Connect using different credentials".
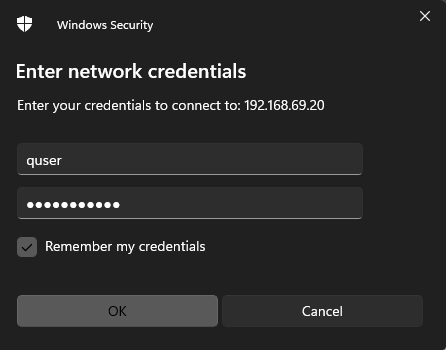
Enter in these credentials
| Username | quser |
| Password | noquestions |
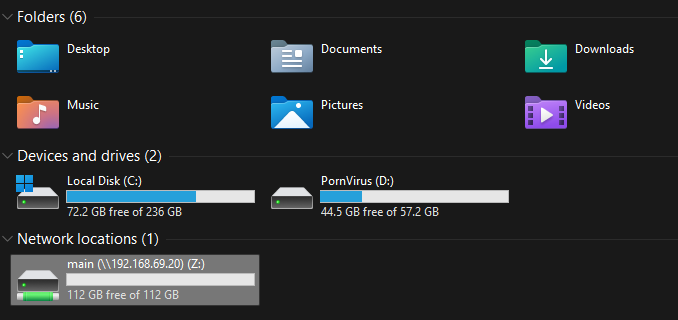
Done! You should now see the drive show up in file-explorer, and it should act like you have another drive plugged into your computer.
MacOS SMB Connection
Disaster! Backup NAS
In the case of a catastrophic failure, we have hot-spare ready to go which should be a 1-1 copy of the primary server. This backup server is using hard-drives, making for a much less responsive editing experience, but it will work. It is a bi-directional sync, so if the primary server starts up again, all of the changes will sync back to it.
To connect to the backup server, complete the exact same steps as for the primary NAS, but replace the IP "192.168.69.20" with the backup NAS's IP "192.168.69.19".
Post-Production
Editing Tools
We're using the Adobe suite for editing. If you're helping with editing, make sure you have access to this! Premiere pro, Audition, and After Effects. It'll be useful to have a good grip on editing with Premiere before Friday. We can help you get these tools if you don't already have them.
Encoding Settings
Read here: https://www.48hours.co.nz/city-info-1/film-submission/
In summary, we should use:
- Video Codec: h.264
- Audio Codec: AAC-LC
- File extension: mp4
- Framerate: 25fps
- Resolution: 1920 x 1080 (HD)
- Aspect Ratio: 16:9
- Pixel Aspect Ratio: 1.0 (Square Pixels)
- Field Order: Progressive playback
- Video Format: 'PAL' (for those shooting on analogue or webcam systems your entry must be output at 25fps (frames per second), and be set within a 16:9 frame.
- Video Bitrate: Variable bit rate encoding approximately 10 megabits per second.
- 1920 x 1080: 10 megabits per second (i.e 10mb/s or 10000 kb/s)
- Audio Bitrate: 192 kb/s
- Audio Sample Rate: 48kHz (ie - 48,000 Hz)
Premiere and Media Encoder have this as a preset we can use -> H.264 and then use the Youtube 1080p preset.
Final Film Timeline
| Section | Duration | Notes |
| Team Intro | Up to 20 seconds | Fully optional |
| Info Card | 10 seconds | ‘Film’ title, Team name, Genre, Ultra (if registered), City - template here |
| The 'Film' and Credits | Between 1 minute and 5 minutes | We need to be careful about the 5 minute limit here. Credits should include "Made as part of 48HOURS 2022". |
| Black video | 5 seconds |
Where To Put Files When Importing
Where to put files when importing into the NAS
Notes for Sony a7 MkII:
File path is: D:\PRIVATE\AVCHD\BDMV\STREAM
Chicken Dead Film:
Importing video:
Open the NAS > Open main folder > Open 48Hours 2022 folder > Open Chicken Dead Folder > Open RAW Video folder > Make folder with good name> Place video in folder
Importing audio:
Open the NAS > Open main folder > Open 48Hours 2022 folder > Open Chicken Dead Folder > Open RAW Audio folder > Make folder with good name > Place audio in folder
Metal Grandma Film:
Importing video:
Open the NAS > Open main folder > Open 48Hours 2022 folder > Open Metal Grandma Folder > Open RAW Video folder > Make folder with good name > Place video in folder
Importing audio:
Open the NAS > Open main folder > Open 48Hours 2022 folder > Open Metal Grandma Folder > Open RAW Audio folder > Make folder with good name > Place audio in folder